Define Your Garden’s Character with a Gate
by Karen Smoczynski
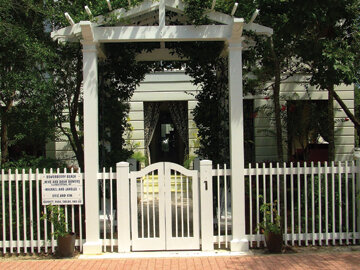
This charming gate incorporates an arbor, adding to its good looks and usefulness. Photo by Al Smoczynski
Pick up any home gardening magazine and you’ll see stunning photos of garden rooms — and usually a gate or arbor sets those rooms off. Even a utilitarian wire fence can have a simple wood gate that adds flair; tall shrubs or flowers on either side will further set it off. Every garden needs a gate, even if it isn’t entirely fenced. A gate adds character and allure to your garden. Consider your garden gate an aesthetic statement, one perhaps that invites people in. Before deciding on a gate, decide exactly what you want that gate to do.
We recently visited the community of Seaside in Walton County, in Florida’s panhandle. This community was planned in the early 1980s to be pedestrian friendly, and the picket fence is almost synonymous with Seaside. Taking in the many different gate possibilities kept us walking throughout this small town and nearby Seagrove Beach.
Wood is unmatched for its versatility in fence and gate building, but it does have some drawbacks. Wood typically lasts about 20 years, and the posts are often the first to go. Regular maintenance will help the fence look its best, but may not prolong its life that much. Although the garden gates of Seaside were all painted white, paint is really not recommended for wood fences. Stains or waterproof coatings require less upkeep. Waterproof coatings need to be renewed annually. Semi-transparent stains will last 3 to 4 years; solid color stains last 5 to 7 years.
Use sturdy hardware, such as strap hinges, to keep your gate square. Photo by Al Smoczynski
Treated southern pine is the only wood to use for posts, and the label should specify that it has been treated for ground contact. White and red cedar, redwood and cypress are durable woods, but quite expensive.
Vinyl is maintenance free, but does get brittle and crack over time. Warranties range from 20 years to lifetime. The hollow PVC posts are reinforced with wood or metal. Colors are usually limited to white or off white. Composites made of wood particles and plastics require posts set every 6 feet, while wood panels are usually sized for 8-feet spacing. Other manmade materials include steel or aluminum made to look like wrought iron and fiberglass. Wire gates can be dressed up with ornamental toppers, and offer a barrier without obstructing the view.
There are unlimited possibilities for designs for wooden garden gates. Pickets, vertical boards, lattice or simple wood frames with diagonal bracing and backed by wire are some basic choices. From there, your plan can take off with unique design elements, such as openings cut into the sides of vertical boards to create a design, or special cuts to the top of the fence picket. Add unique post caps to further set off your gate.
A floral cutout and ball and cap post tops really make this gate stand out. Photo by Al Smoczynski
Three to four feet is a typical height for a fence and gate to enclose a garden and/or keep children and pets in. Pool fences usually are required to be 4 feet high and privacy fences are usually 6 feet or more. A permit may be required for installing a fence.
Purchase sturdy hardware for your gate. Strap hinges and L-shaped hinge pins and a sturdy latch are essential. Use screws to secure gate components; we prefer to use bolts at the corners to ensure the gate remains square. Because all of the weight of the gate is borne on the hinge side, the design should incorporate diagonal bracing to help keep the gate square. If your gate does sag, a turnbuckle can be used to help keep it in line, and heavy gates can be supported by a wire to the top of the latch side attached to a tall gate post.
The posts are the most important part of your gate. At least one-third of the post should be set in the ground for stability. Posts can be set in packed soil, but cement will ensure your posts remain plumb. The cement should come to just above grade level, and be sloped up to the post so that water does not collect around the post. Posts should be set at least a week before hanging the gate.
Cement planters anchor this gate and further define the entrance. Photo by Al Smoczynski
Building a wooden gate is not difficult and requires simple carpentry tools.
Be sure all the components are cut square and to the proper size. Assemble your gate on a flat surface, and check that all four corners are square. Lapped joints will add strength to your gate. If you are applying a finish to your gate, hang the individual pieces from hooks to make it easy to coat all surfaces. Apply a final coat of finish after the gate is assembled.
Mark out the positions of your gate hardware so you avoid putting screws in areas where you will have to drill to attach the hardware. Secure all components with rust-resistant screws, then flip the gate over and add screws from the other side as well. Mount your hardware, and then you are ready to hang your gate. Prop it up in place and mark where the hinge pins will go. Adjust pins so the gate hangs square, then add your gate latch.
Now sit back and enjoy your garden gate.
© 2014 Karen Smoke (Smoczynski). Originally published in Florida Gardening, Oct / Nov 2014. Reprinted by permission. All rights reserved.


